There have been a few times people have asked me “How do we assign applications roles in Azure Active Directory to a managed identity as we cannot do it in the portal?” and the answer is “You cannot”.
For those who do not know what a managed identity is, it is an automatically managed identity, by Azure Active Directory for applications to use when connecting Azure resources that support Azure AD authentication. This means they can obtain Azure AD tokens without having to manage any credentials. You can find more information on managed identities here. https://learn.microsoft.com/en-us/azure/active-directory/managed-identities-azure-resources/overview. Also, to clear things up, this blog is referring to application roles and not Azure Role Based access control for Azure Resources.
My typical interaction with managed identities in Azure Logic Apps and Azure Functions, as this is where I spend a fair amount of time, building things for Microsoft Sentinel. When it comes to deployment, I prefer to use an automated pipeline, therefore I want script anyway, but for those who only use the portal, you do not have much of a choice with Managed Identity App permissions.
Now there is a script here, https://learn.microsoft.com/en-us/azure/active-directory/managed-identities-azure-resources/how-to-assign-app-role-managed-identity-powershell?tabs=azurepowershell#complete-script, but it’s limited to one permission at a time.
Lets step through the script. I will show you where to get the information needed, using the portal, but feel free to script it.
$TenantId = "00000000-0000-0000-0000-000000000000"
$ObjectId = "00000000-0000-0000-0000-000000000000"
The $TenantId variable is the GUID of the tenant within Azure Active Directory, where the managed identity is created.
The $ObjectId can be found in Azure Active Directory, but for managed identities, they are more easily found under the Identity pane of the resource under “Object (principal) ID” as shown below.

Next we are going to build the permissions, because I want this script to be able to apply multiple permissions at once, this section needs to be constructed correctly.
$oPermissions = @(
    @{
    applicationId       = "fc780465-2017-40d4-a0c5-307022471b92" #WindowsDefenderATP
    permissions = @(
      "Vulnerability.Read.All"
    )
  }
)
Lets break this down. $oPermissions is an array, so it will take any combination of objects. Each object is just a simple hashtable with two values, applicationId and permissions.
The applicationId can be found in the portal. When I was looking, I got the application when I was building the permissions out on an app registration, which you can do via the portal, using the api permissions UI, but that does not work for all api’s
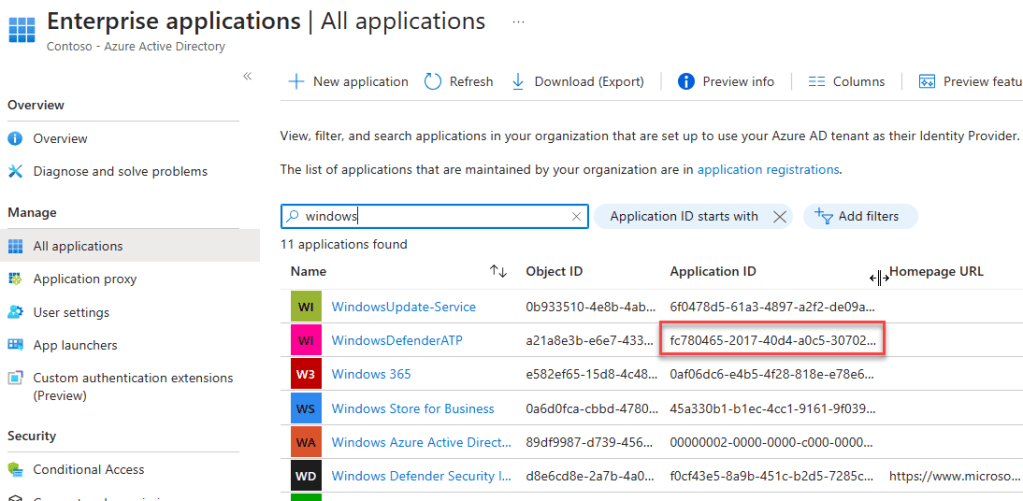
If you navigate to Azure Active Directory, then Enterprise Applications and ensure there are no filters applied, you can search for the application here. In my example below, you can see I have searched for “Windows” and WindowsDefenderATP is listed (which is the permission I want), which has an application Id of fc780465-2017-40d4-a0c5-307022471b92.
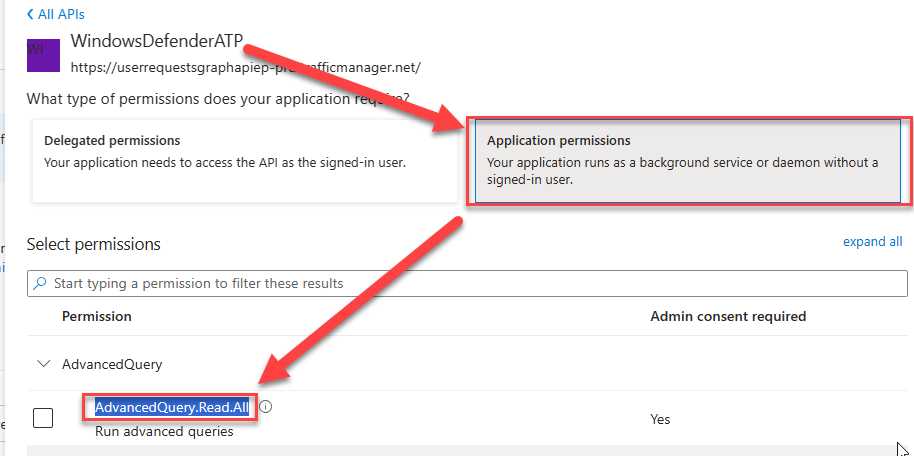
Now we need to build the permissions. This is just a comma separated list of the permissions. If you are using the UI, it is easier (in my opinion) to get these values by adding the permissions to an existing app registration (you do not need to press apply). Make sure you select the right type of permissions, for my use case I have selected Application permissions as the logic apps run in the background.
Ensure you can run the script. You can do this either in the Azure Cloud shell or locally. If running locally, make sure you have the up to date modules installed for Microsoft.Graph
Also ensure your account has sufficient permissions to manage the Applications. The built in role Cloud Application Administrator should be sufficient enough.
Now you’ve made the relevant changes. Run the script. Just be aware it will open a login prompt for you to sign in.
Go on, run the script, do it.

Ok, it’s all over now, it should have run pretty quickly. I’ve provided a link in the script console, to take you to the portal to view the results. I haven’t added any validation in the script at this time, but I will do if someone wants me to.

Clean up
I’ve also added a small clean up script, which will remove all App roles from the application, but it is commented out at the bottom. Just uncomment the code and execute it to clean it up. All it needs is the Managed Identity object Id
# Clean Up
# Note this removes all app roles

Get-MgServicePrincipalAppRoleAssignment -ServicePrincipalId $oPrincipalId | Foreach-Object {
  Remove-MgServicePrincipalAppRoleAssignment `
    -ServicePrincipalId $oPrincipalId `
    -AppRoleAssignmentId $_.Id
}
As always, the script can be found somewhere hiding in my GitHub repo, though I will make it easier and provide a link here https://github.com/TheAlistairRoss/The-Cloud-Brain-Dump/blob/main/Toolshed/AssignManagedIdentitiesPermissions.ps1
