It would be fair to say that SOC analysts have to deal with a lot of alerts, leaving them overwhelmed.

Poorly configured alerts, reoccuring patterns and new and emerging threats can soon stack up, meaning that many investigations aren’t being investigated or investigated properly. This is where automation comes in.
Now this current series isn’t about automation as a whole, but specifically entities, data items which are categories by specific attributes, like an account or IP Address. With Microsoft Sentinel, there are two methods for built in automation, either Automation Rules or playbooks.
Automation Rules
Automation rules allow you to centrally manage automation within Microsoft Sentinel and apply automation to a scope that you require, for example:
- Suppress noisy incidents.
- Add incident tasks.
- Run a playbook
- Triage new incidents.
- Change the status.
- Assign an owner.
- Tag an incident.
- Close incidents.
When creating automation rules, you have to pick the condition in which the rule will run. Common conditions include the incident provider and analytic rule name, which you can select which sources trigger the automation rule, but you can go much more granular with attributes like entities. You may have a scenario like the one depicted below where you only want the automation to trigger if incident or alert has an account entity where the NT domain equals “contoso.com”

Now as you build your automation, you can handle your alerts and incidents differently based on the entity in question, such as assigning the incident to a particular team, or closing it as it is expected behaviour.
You aren’t limited to just a single selection, you can select a combination of conditions to meet your requirements.
Playbooks
Playbooks are a little more complex in how they work, but give greater flexibility and control. Playbooks are the SIEM terminology given to Azure Logic Apps when used within Microsoft Sentinel
For those not familiar with Azure Logic apps or Power Automate, they are a low code / no code solution that allows you to build and run automated workflows. There are many Playbooks available in the Microsoft Sentinel Content Hub or you can create your own. If you need a tutorial for getting started, you can find one here Tutorial – Automate threat response in Microsoft Sentinel | Microsoft Learn
When handling entities with Playbooks, you must first understand the various Playbook triggers for Microsoft Sentinel as each of these will require you to handle entities slightly differently.
- Incident Trigger
- Alert Trigger
- Entity Trigger
You can run playbooks using other triggers as well, such as a scheduled trigger, but we will stay with the Microsoft Sentinel triggers for now.
Incident and Alerts Trigger
The incident trigger is initiated either by an automation rule or manually. To start using the entities, you will want to gather the entities for a specific type, such as account or IP address. This is because they have similar attributes and you will want to handle the data differently depending on the entity type.
Filtering out the most common ones are simple, you can simply select the list of entities from the incident trigger and pass it into the Entities connector. The current connectors are:
- Entities – Get Accounts
- Entities – Get DNS
- Entities – Get FileHashes
- Entities – Get Hosts
- Entities – Get IPs
- Entities – Get URLs
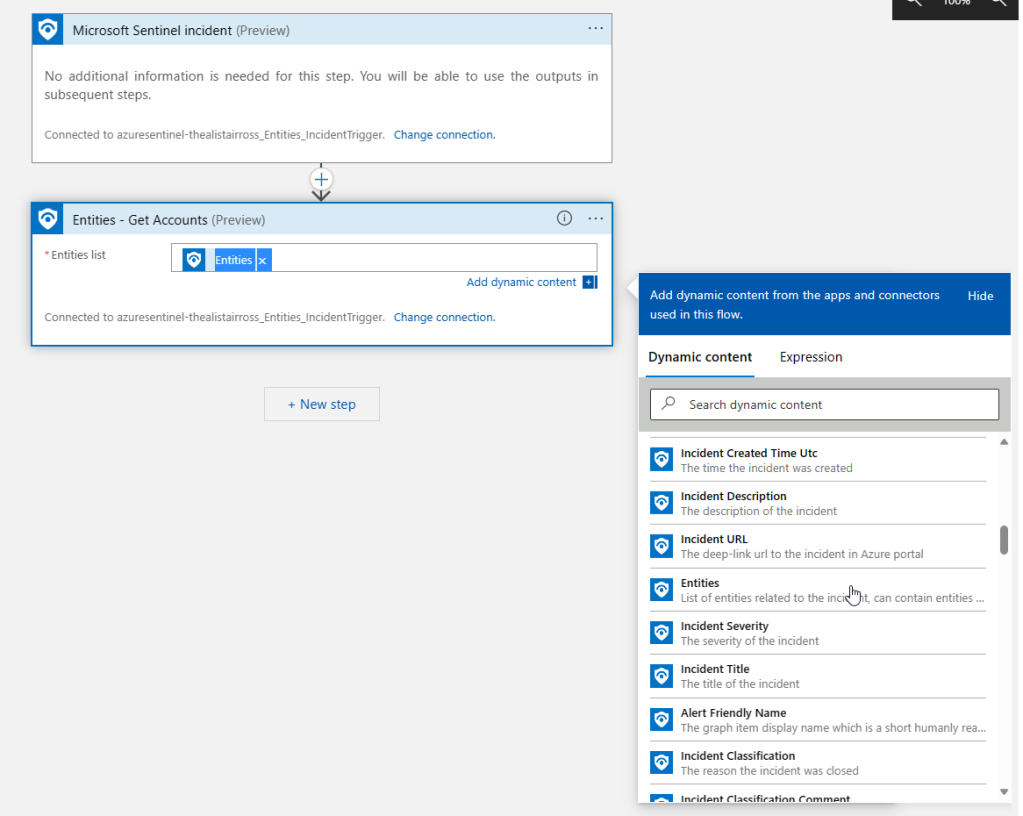
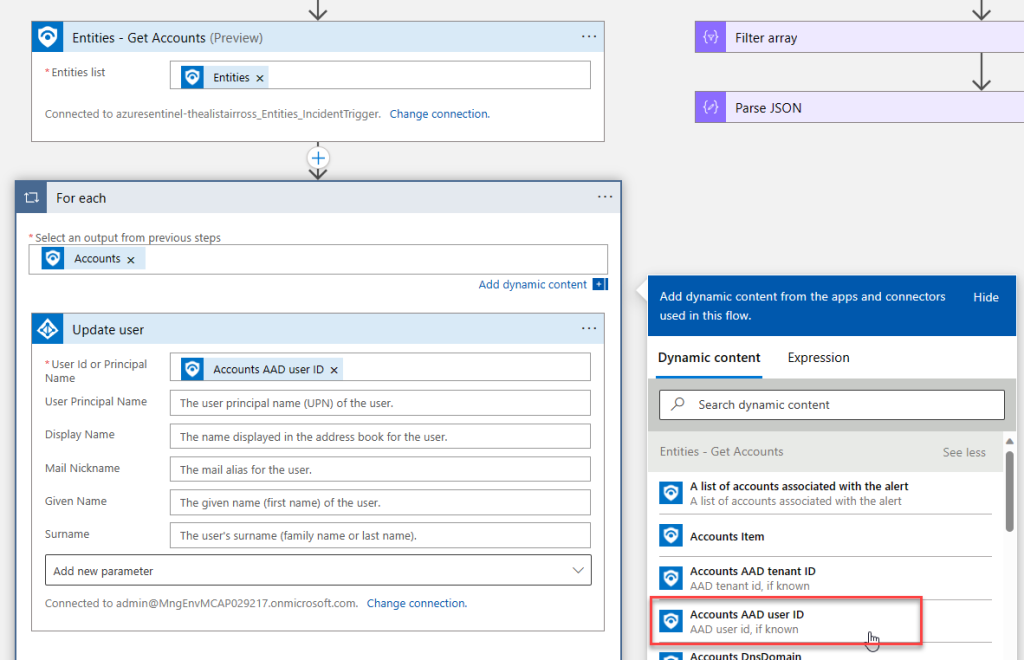
This will output an array object, filtered to that specific entity type which you can use in further steps, like that shown below. You can see you can easily select the entity attributes as dynamic content. Just be aware as it is an array, it will nest the connector you are using inside a For each loop.
Filter array
If you want to filter entities that doesn’t have an entities connector, you can use the Data Operations – Filter array and Parse JSON connectors to do this.
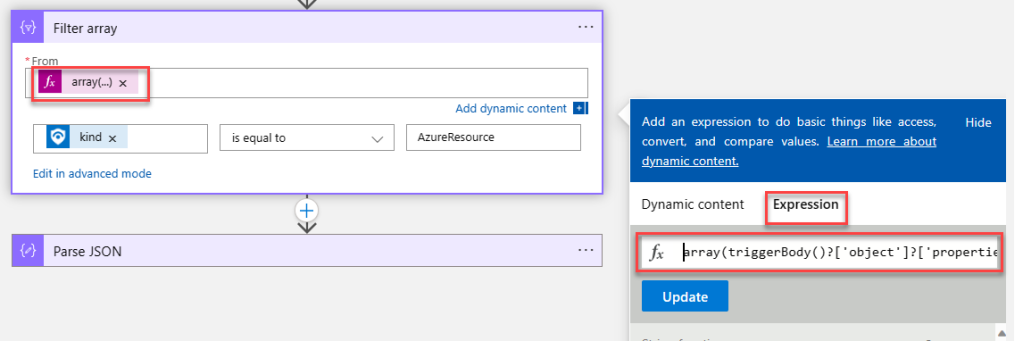
When creating the filter array, you will need to map the entities data to an array type. To do this, enter the following expression into the “From” field as shown below. Be aware that it will be different depending on the trigger you use.
Incident Trigger
array(triggerBody()?['object']?['properties']?['relatedEntities'])Alert Trigger
array(triggerBody()?['Entities'])
Next, in the conditions field, type in the expression:
Incident Trigger
item()?['kind']Alert Trigger
item()?['type']
As the entities are an array, this will evaluate the “kind” property on each one.
Now select “is equal to” as the comparison operator and then set the “Value” field to that of the entity type you are filtering. If you are unsure of the value, run a simple playbook with the relevant trigger (no other connectors are needed) and observe the output. In my example I have used “AzureResource” for the incident trigger and “azure-resource” for the alert trigger.
Parse JSON
Now that you have filtered the data, to make it usable in a consistent manner, you will need to parse the data. To do this, run the playbook and view the output from the workflow run history Make sure you select the entire array from the body, not just the objects themselves

For example:
[
        {
            "id": "/subscriptions/a00000000-0000-0000-0000-000000000000/resourceGroups/resourceGroupName/providers/Microsoft.OperationalInsights/workspaces/workspaceName/providers/Microsoft.SecurityInsights/Entities/403c153c-f25f-dabe-1d87-3d26d605620c",
            "name": "403c153c-f25f-dabe-1d87-3d26d605620c",
            "type": "Microsoft.SecurityInsights/Entities",
            "kind": "AzureResource",
            "properties": {
                "resourceId": "/subscriptions/00000000-0000-0000-0000-000000000000/resourceGroups/thealistairross/providers/Microsoft.Logic/workflows/thealistairross_Entities_IncidentTrigger",
                "subscriptionId": "00000000-0000-0000-0000-000000000000",
                "friendlyName": "thealistairross_Entities_IncidentTrigger"
            }
        }
]
Now click “Use sample payload to generate schema” and paste in the array from the previous step, it will create a schema based on the first object in the array. Also make sure you’ve populated the “Content” field with the “Body” dynamic content from the previous filter array connector.

The output can now be handled in the same way as the built in entities connectors, allowing you to filter and parse any entity output in Logic Apps.
Entity Trigger
The last trigger is the Microsoft Sentinel entity trigger. This trigger allows you to run a playbook manually against a single entity. The previous triggers passed all entities from the alert and allowed you to filter on a type, but you may have a scenario, such as locking out a single user on an incident, which you only want to run for one of the entities in a given alert / incident. This trigger cannot be run by automation rules.
Now getting started with this trigger is simple, when creating a playbook, select the entity trigger and the UI will display supported entity types which are:
- Account
- DNS
- FileHash
- Host
- IP
- URL

Now the trigger has the details of the entity which you can use in subsequent steps. It also provides the incident ARM Id, so you can correlate it with the incident you triggered it from.

Now I hear you say, what happens if I run a playbook designed for an account entity for a different type of entity. Short answer, you cannot. To run an entity playbook, you need to select the entity within the incident overview blade. In my example below, I have three entities, an account, an IP address and an azure resource. Because account and IP address are supported for entity triggers at this time, both have the ellipses which you can select Run playbook, therefore I cannot run it for the azure resource.

Also if I was to select the IP address, I would only see Playbooks with the entity trigger set to IP address, meaning I cannot accidently trigger a playbook for the wrong entity type.
As you may have already noticed, many of these connectors are in preview, so I would hope there will be support for more entities in automation in the future.
If you want to try it out yourself, you can build the connectors manually or deploy the code from my repository here.
Sentinel Entities/Automation · TheAlistairRoss/The-Cloud-Brain-Dump · GitHub
When deploying this code, you have the option of deploying an analytic rule, which simulates an incident and 3 playbooks which simulate the discussed options.
I hope this provides some clarity on entities and I am sure I will be adding more as Microsoft Sentinel time passes and more features are added.
